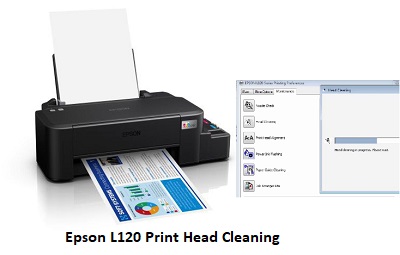
Epson L120 Print Head Cleaning: A step-by-step guide on how to clean the print head for improved print quality. The Epson L120 is, a reliable and efficient inkjet printer known for its high-quality prints. Over time, however, you may experience print quality issues such as streaking, faded colors, or missing lines on your documents.
These problems often indicate a dirty or clogged printhead. Cleaning the print head is an easy and inexpensive way to restore your printer’s performance and maintain your desired print quality. In this step-by-step guide, we will walk you through the process of cleaning the Epson L120 print head.

Epson L120 Print Head Cleaning | Why should you clean your print head?
Cleaning the print head is an important maintenance task to ensure that your printer works at its best. Over time, ink residue, dust, and other particles can build up on the print head nozzles, causing blockages and reduced print quality. Cleaning the printhead can help in the following ways
- Improve print quality: Cleaning the print head removes obstructions and ensures that ink flows smoothly, resulting in sharp, vibrant prints.
- Prevent clogs: Regular maintenance can prevent more serious blockages that may require professional service.
- Extend printer life: Keeping your printer clean and well-maintained can extend its life.
Now, let’s dive into the step-by-step process of cleaning the Epson L120 print head:
Step 1: Gather your supplies
Before you start cleaning the print head, you’ll need some supplies:
- Epson L120 printer: Make sure it’s turned on, but not currently printing
- Computer: You may need to access the printer’s settings
- A4 paper: To perform a nozzle check and test prints
- Epson print head cleaning kit (optional): These kits usually include cleaning solution and syringes
Step 2: Epson L120 Access the printer software
- On your computer, go to Devices and Printers or Printers and Scanners. Locate and select your Epson L120 printer.
- Next, Right-click on your printer and select “Printing Preferences”
Next, Step 3: Initiate a Nozzle Check
- In the Printing Preferences window, navigate to the Maintenance tab
- Click the Nozzle Check or Print Quality Check option. This will print a test page to determine which nozzles are clogged or misaligned.
Step 4: Interpreting the Nozzle Check Results
- After the nozzle check is complete, examine the printed page. It will typically contain a grid of lines and blocks of different colors. If you see missing lines or gaps in the color blocks, these are indicators of clogged nozzles.
Step 5: Run the Head Cleaning Utility Epson L120
If you have identified clogged nozzles in the nozzle check, you can proceed to the head cleaning process:
- In the Maintenance tab of the Printing Preferences window, locate and select Head Clean or Clean Print Head.
- Follow the on-screen instructions to begin the cleaning process. This may take several minutes.
Next, Step 6: Perform another nozzle check
- After the head cleaning is complete, repeat the nozzle check to verify that the problem has been resolved. If the test page still shows missing lines or gaps, you may need to repeat the cleaning process. It may take several cleaning cycles to completely clean the nozzles.
Step 7: Epson L120 Clean manually (if necessary)
If the automatic head cleaning doesn’t solve the problem, you can perform a manual cleaning. Here’s how:
- Turn off the printer Epson L120 and unplug the power cord
- Open the printer cover to access the print head
- Gently wipe the print head with a lint free cloth dampened with distilled water, Be careful not to damage the print head.
- Allow the print head to dry completely before reassembling and turning on the printer
Step 8: Epson L120 Test Your Printer
- After the manual cleaning, run another nozzle check and print a test page. There should be a noticeable improvement in print quality. If not, consider repeating the manual cleaning process or contacting a professional technician.
Conclusion
Regular cleaning of the print head of your Epson L120 printer is essential for maintaining print quality and extending the life of the printer. By following this step-by-step guide, you can easily resolve print head problems and ensure that your documents and images continue to look their best. Remember to perform regular maintenance to keep your printer in top condition and enjoy years of reliable printing.


